jane1187
New member
- Joined
- Jul 23, 2009
- Messages
- 285
- Reaction score
- 21
- Points
- 0
- Location
- Bierley, Yorkshire
- Country
- United Kingdom
Hello all,
After my previous thread about how to cut a hole in a ceramic pot plant I thought I'd share my ingenious (well I think its genius!) escape-proof lid. I took my inspiration from other people's solutions and have come up with my own combination. It has cost me a total of about £20 to do all 6 of my tanks (2 large and 4 small).
I remember one person saying they used mesh and a wood frame to make a tight fitting lid. I was unsure as to whether wood would rot and am unsure as to what wood treatments are safe for newts so I chose plastic and greenhouse shading.
You can make a lid to fit over the outside of or on the inside of the tank. Up to you.This particular one I'm making will sit on the two ledges inside the top of my tank.
Step 1: Buy plastic angles, available from most DIY stores (in the UK I got mine from Wickes). It is sold in 2.5 metre lengths or so so you can do up a couple of small tanks with 1 length. I think it cost me £2.50 per length. (SEE PHOTO 1)
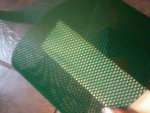
Step 2: Buy greenhouse shading. This is basically a close-weave plastic mesh used to give extra shading from the sun in greenhouses. Might be sold as something different elsewhere. Any similar stiff plastic mesh will do. (SEE PHOTO 2). Costs £1.50 per m2 so may do two large tanks or several small tanks, depending on area.
Step 3: Buy an aquarium sealant. I read online that you can buy sealants for bathrooms that are non-toxic but I used one once and it 'melted' and leaked into my tank (luckily the newts weren't in it) so play it safe and buy a proper aquarium sealant. Mine cost me £5.99 for a 310ml tube from 'ideal sealants' (online). Will last me a fair while!
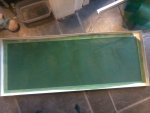
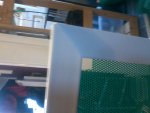
Step 4: Cut the white angle to size to make a square/rectangular frame. This frame can fit inside or outside your tank. Stick the frame together with tape to hold it firm (SEE PHOTO 3). Make sure it fits the tank before you start sealing it! You should be able to put the plastic with some strong scissors but I used a hack-saw (cause I have a well stocked tool box ).
).
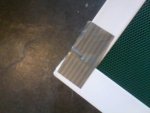
For wires/tubes you can cut one corner at an angle. When sitting normally there will be no gap in the frame, but if you don't glue it it will be flexible with the mesh and you can slide your wires in between and re-close it (SEE PHOTO 6 and 7 of the same corner, one sitting flush and one with me bending the frame).
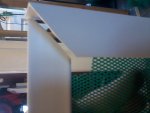
Step 5: Cut the mesh to size within the frame. Ideally we should be gluing it to the underside to make the lid nice and pretty. (SEE PHOTO 4). If you're leaving a gap for the wires you might want to small square out in the corner where you've cut your angles (SEE PHOTO 6).
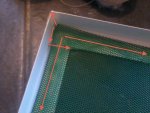
Step 6: Apply the sealant. You must be quick with the next two steps. The sealant I bought gets a skin within 10 minutes. Apply sealant to the corners of the plastic frame to make sure the frame stays together (SEE PHOTO 5, apply sealant along the arrows in the corner). REMEMBER! Don't glue the corner you're slotting the wires into!
Then run a line of sealant all around the inside of the frame (SEE PHOTO 5, apply sealant along the long arrows).
Step 7: Insert the mesh. Press the mesh onto the line of sealant and run your finger along it to press it into the sealant. The sealant should easily wash from your hands with hand soap, alternatively leave it to dry and it should peel easily from your fingers like PVA glue.
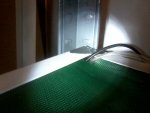
Step 8: Once dry (15 mins or so later, but I left it 45 mins), put onto your tank. Pull the unsealed corner gently apart to slot the wires into place. If concerned put a piece of tape (I use fabric tape) to ensure the gap stays closed. You can then wrap foam around the gap in the mesh for extra security if you want (not inserted in PHOTO 8, but will be).
Voila! an escape-proof lid made of non-toxic materials that will not rot or degrade!
ALL THIS (except shopping time!) TOOK ME 20 MINS!!!!!(plus drying time). So all in all I made it within 24 hours.
Hope this inspires anyone else out there to do some DIY escape-proofing!
After my previous thread about how to cut a hole in a ceramic pot plant I thought I'd share my ingenious (well I think its genius!) escape-proof lid. I took my inspiration from other people's solutions and have come up with my own combination. It has cost me a total of about £20 to do all 6 of my tanks (2 large and 4 small).
I remember one person saying they used mesh and a wood frame to make a tight fitting lid. I was unsure as to whether wood would rot and am unsure as to what wood treatments are safe for newts so I chose plastic and greenhouse shading.
You can make a lid to fit over the outside of or on the inside of the tank. Up to you.This particular one I'm making will sit on the two ledges inside the top of my tank.
Step 1: Buy plastic angles, available from most DIY stores (in the UK I got mine from Wickes). It is sold in 2.5 metre lengths or so so you can do up a couple of small tanks with 1 length. I think it cost me £2.50 per length. (SEE PHOTO 1)
Step 2: Buy greenhouse shading. This is basically a close-weave plastic mesh used to give extra shading from the sun in greenhouses. Might be sold as something different elsewhere. Any similar stiff plastic mesh will do. (SEE PHOTO 2). Costs £1.50 per m2 so may do two large tanks or several small tanks, depending on area.
Step 3: Buy an aquarium sealant. I read online that you can buy sealants for bathrooms that are non-toxic but I used one once and it 'melted' and leaked into my tank (luckily the newts weren't in it) so play it safe and buy a proper aquarium sealant. Mine cost me £5.99 for a 310ml tube from 'ideal sealants' (online). Will last me a fair while!
Step 4: Cut the white angle to size to make a square/rectangular frame. This frame can fit inside or outside your tank. Stick the frame together with tape to hold it firm (SEE PHOTO 3). Make sure it fits the tank before you start sealing it! You should be able to put the plastic with some strong scissors but I used a hack-saw (cause I have a well stocked tool box
).For wires/tubes you can cut one corner at an angle. When sitting normally there will be no gap in the frame, but if you don't glue it it will be flexible with the mesh and you can slide your wires in between and re-close it (SEE PHOTO 6 and 7 of the same corner, one sitting flush and one with me bending the frame).
Step 5: Cut the mesh to size within the frame. Ideally we should be gluing it to the underside to make the lid nice and pretty
. (SEE PHOTO 4). If you're leaving a gap for the wires you might want to small square out in the corner where you've cut your angles (SEE PHOTO 6).Step 6: Apply the sealant. You must be quick with the next two steps. The sealant I bought gets a skin within 10 minutes. Apply sealant to the corners of the plastic frame to make sure the frame stays together (SEE PHOTO 5, apply sealant along the arrows in the corner). REMEMBER! Don't glue the corner you're slotting the wires into!
Then run a line of sealant all around the inside of the frame (SEE PHOTO 5, apply sealant along the long arrows).
Step 7: Insert the mesh. Press the mesh onto the line of sealant and run your finger along it to press it into the sealant. The sealant should easily wash from your hands with hand soap, alternatively leave it to dry and it should peel easily from your fingers like PVA glue.
Step 8: Once dry (15 mins or so later, but I left it 45 mins), put onto your tank. Pull the unsealed corner gently apart to slot the wires into place. If concerned put a piece of tape (I use fabric tape) to ensure the gap stays closed. You can then wrap foam around the gap in the mesh for extra security if you want (not inserted in PHOTO 8, but will be).
Voila! an escape-proof lid made of non-toxic materials that will not rot or degrade!
ALL THIS (except shopping time!) TOOK ME 20 MINS!!!!!(plus drying time
). So all in all I made it within 24 hours.Hope this inspires anyone else out there to do some DIY escape-proofing!